Tuesday, 21 May 2013

Techsoft Designing

Techsoft Designing

1. I used a software called 'Techsoft 2D design'. It is a quick and easy software which you can use to design, in this case, I used 'Techsoft 2D design' to design the acrylic which I am going to use on my lamp.

2. I started off selecting 'grid lock' and I then drew a square which measured 160x140. The square was going to be my acrylic base on my lamp. Because It was my acrylic base on my lamp, i copied and pasted the square so that i had 4 squares.

3. I then went onto Google images and typed in the pictures I needed for my lamp designs. In order to get line drawings, I selected, 'Search Tools', then 'Type' and finally 'Line Drawings'.

4. I copied and pasted all my images and placed them underneath the squares as I wanted to laser cut them separately so that the two different pieces of acrylic would be two different colours. 


5. I then started to label my designs. I did this so that the laser cutter knew what to cut. For example, I labelled my designs as:

Purple Background
Transparent
Opaque
Engraved
Cut
Separate
Glued on ...

6. Once I completed all my labeling, I saved my work on the shared drive and my work had been sent to the laser cutter to be cut.


Line Drawings on Google Images

Acrylic
Laser Cutter

Techsoft 2D design


Thursday, 16 May 2013

How I made my lamp frame

How I made my lamp frame!


  1. Firstly, I collected all my wood pieces:
  • X4 160mm of pine wood
  • X4 100mm of pine wood
2.   Then I labelled my chosen pieces with my name on it so that I would not get my work mixed up with others work.

3. I numbered the corners of my wood pieces so that I knew where to attach all the corners of my wood together.

4. Next, I drew crosses on my wood where I was going to drill into for the dowels.

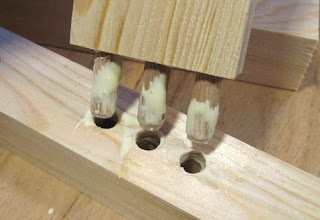
5. I then went over to the drilling machine and drilled into the center of all the crosses on every piece of wood. I drilled holes twice into all 8 pieces of wood so that I could place dowels inside. The dowels are a part of a dowel joint which is look like little pegs coming out of wood. The dowel joint is strong and sturdy and that is why I am going to use it.


Rectangular Wooden Lamp Frame

Dowel Joint

6. After the drilling I moved onto making my dowels. I was given a piece of dowel and I had to mark lines on the dowel but the gap between had to be 15mm (1.5cm). The dowel was the joint I was going to use for my lamp. 

7. After I marked my dowels, I collected my equipment:
  • Bench Hook
  • Tenon Saw
I placed the Bench Hook into the Vice and placed my dowel stick on the Bench Hook. I then started cutting on the lines that I marked untill I had completed all pieces of dowel.


Vice

Bench Hook


Tenon Saw


Wednesday, 8 May 2013

Inspiration!

My Inspiration Pictures!

Inspiration Pictures are all about what inspires me most. In my Resistant Materials Year 8 Lamp project I was given three themes to decide from:
  1. Natural Form
  2. Memphis Design
  3. Art Deco
One of these three themes was what I was going to base my project on. I decided to use the Memphis Design form as it is all about solid, bold colours and shapes and i thought that i could make a really unique design with this theme.

Here are some main and important Inspiration Pictures which are all about Memphis Design:

A Memphis designed sofa with block and solid colours.

 A Memphis designed lip sofa with block red covering it.

A blue solid Memphis designed shelf.

A Memphis Designed room with simple and block colours.